Wednesday, May 8, 2013

Corn In The Dirt!

There are two types of corn I'm growing this summer (both seen on this page): Luscious, which is an organic hybrid, and Silver Queen, one of the oldest regular (non-hybrid) varieties. (By the way Natural Gardening is the excellent company from which I ordered all of my seeds for this summer.)

Unfortunately, organic Silver Queen seeds are not available, but at least I'll be growing them organically. I could have picked something else, but frankly I knew when I started this project that I had to try Silver Queen. It has a deserved reputation as being one of the corns that takes most like corn, as opposed to just being sugary sweet.

A couple of nights ago, I pulled out five seeds of each variety, soaked them in water for a few hours, folded them in a wet paper towel, placed the towel on a plate, and enclosed the whole thing in a plastic bag. This process is called pre-sprouting, and it's a huge time saver. A seed basically needs water and heat to germinate. You can stick it in the soil and wait, or you can take the steps above and accelerate the process—shortening it from a period of 12 days or more down to a day or two.

After two days, this was my reward:

Roots and sprouts!
We had torrential rains today—which is actually a good thing, because it soaked all the planter boxes—but now that my seeds were growing, I had to get them into the ground!

Fortunately, the weather broke this evening. I picked the best four of each type of seed and got them into their squares.
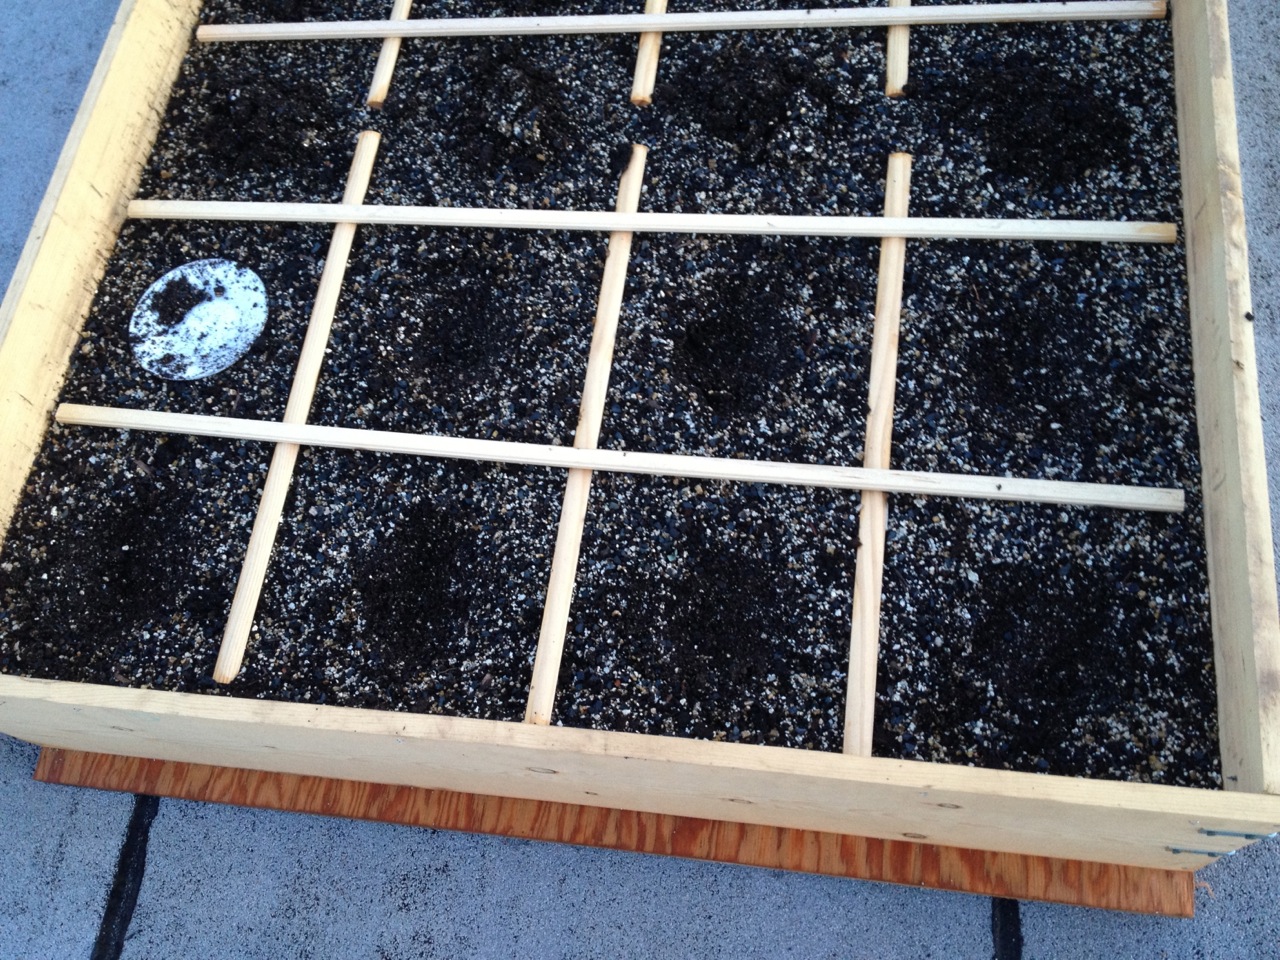
One of the SFG maxims is to make a little saucer depression around each plant
so that water and nutrients are naturally guided to its stalk.  
Each saucer then gets a small depression at its center which is filled with a mixture of peat and vermiculite.
This gives the seed a very loose, easy medium to start growing in.  
A little corn seed on its bed of vermiculite and peat. 

Covered with vermiculite and a little soil, and watered. 


Tuesday, May 7, 2013

I Am Your Host, Mr. Rourke....


By the way, this is me:

The mask isn't because I'm shy. It's so I don't accidentally inhale a bunch of vermiculite. 
I spent some time today getting the backyard 4 x 4 planter filled with soil. I'm using it for plants that can get by with partial sunlight: lettuce, green beans, cucumbers, spinach, radishes, beets, and a bunch of herbs. 

I took very few pictures. But in case you wanted to know what compressed peat looks like, here's your chance:

Peat. It's what's for dinner your garden. 


Monday, May 6, 2013

Tomatoes Also Grow in Brooklyn

Whether the corn works out or not, there's another set of plants on my roof. My original inspiration for urban gardening came from that other harbinger of summer: The Tomato.

I've been a tomato lover my whole life, but my perspective on the fruit (that's right, I said ‘fruit’!) changed in 2007 when I had this incredible tomato salad in Greece:

Now THAT's a tomato.
These tomatoes were a deep vermilion all the way through. They were bursting with flavor. They made the watery bland orange Florida thing we New Yorkers call “tomatoes” look and taste like an entirely different species.

I never thought I'd have a chance to savor anything like that salad again (and the several like it I had on the remainder of that trip.) But then my wife and I spent a few years in southern California.

For our first three years in Los Angeles, we lived in Silver Lake, and we had an organic farmer's market setting up shop on our corner—literally, on our corner—every Saturday morning. We could (and often did) walk to it in our pajamas.

It was at this market that I first tasted California tomatoes. In this case, it was roma (plum) tomatoes from Beylik Farms. They weren't the Greek tomatoes of my dreams, but they were damned close. I bought them by the bagful, and while I cut many into salads, most of them were reduced into a tomato sauce that gave an incredible added dimension to our homemade pizzas.

I became addicted. I actually learned how to can food because of Beylik tomatoes. When we left LA, we had five or six pints of my tomato sauce make the trip east with us. And I resolved to try to find some way to replicate those luscious Beylik orbs in Brooklyn, going so far as to harvest dozens of seeds from our last few batches.

I've grown tomatoes in our backyard before, to disappointing results. As I mentioned in my inaugural post, only four hours of sun back there. Tomatoes need a lot more light to become truly dazzling.

So next to the corn are two tomato planters. In them I'll be growing 8 tomato plants this summer: two each of Beylik Roma, Beylik Japanese, San Marzano, and Thessaloniki (in a nod to Greece). Whatever happens with the corn (wind, rodents, who knows what?), I am confident of a spectacular tomato harvest later this year.

I started the tomato seeds indoors the first week of April, along with some lettuce plants, cucumbers, and herbs:


Today, I planted the first four plants—two San Marzanos, two Beylik. I'm not sure if they were the Beylik Romas or Japanese, but I'll find out later in the summer.

I set up a small screen with some cheesecloth to protect the new transplants from wind and the mid-day harshest sun, and I gave them a good drink of water.

Poultry wire to make the wind/sunscreen.

Tomatoes in the dirt!

Cheesecloth in place. 

Grow little plants, GROW!

Filling Up the Boxes

More of the same today. 

I filled the planters by the day's end, which was the big goal. And the saving grace is this: this was a one-time operation. Now that all this growing medium is up on the roof, I can reuse it for years, simply adding compost, fertilizer, and the occasional bag of peat moss as needed. Even if the planter rots away, it will be easy enough to shovel the medium into something else.

At the beginning of the day, I decided to put some "weep holes" in the corn planter so that if a torrential rain comes, I won't have to worry about it filling up with water and getting too heavy (or having my soil float out of it).

Hardware cloth and some window screening will allow water out but keep soil in. 
Weep holes from the outside. 
I made a simple screed out of scrap lumber so I'd know when the soil was at the 8" depth I want.
The screed at one end. 

The box is about halfway full. 

Adding in lime and fertilizer.

Adding charcoal.
My brother told me that some planters he'd made a few years ago had exploded outward from the weight of their soil. I took his advice and reinforced mine with some L-brackets I had lying around. 
Reinforcements! 

Filled!
It's a good idea to have a visual sense of your squares in Square Foot Gardening, so you can space your plants properly. You can buy pre-made grids, or just tie some string to nails around the edge. I used a bunch of scrap quarter-round that was in the basement, along with some decorative trim I had left over from shelves I built long ago. 
The finished corn planter. 

Corn planter plus two tomato planters. 


Sunday, May 5, 2013

Creating a Growing Medium

Today started with the tedious process of hauling a ton of various growing media up to the roof via the ladder-and-hatch on our top floor. I'd previously, over time, gotten a bunch of stuff into that 3rd-floor hallway; but getting it up the ladder to the roof was slow, plodding work. And while some media are fairly light (like charcoal and vermiculite), others are pretty damned heavy (like peat moss and compost).

I'm using the Square Foot Gardening method outlined by Mel Bartholomew in his seminal book, Square Foot Gardening (catchy title, huh)? I have a copy of the original edition, published in 1981, in which Mel, "a retired engineer and efficiency expert," comes across as a big ol' hippie.....especially in his cover photo. But the process is sound, and it was crucial to this endeavor. The book has been revised multiple times since 1981, with a complete overhaul and rewrite in 2006. So I may be using some seriously outdated information. We shall see.

One of Mel's biggest messages is that for container gardening, particularly on a hot rooftop, you cannot use regular potting soil. It gets compacted too easily and quickly, and holds too much weight when wet.  You need something loose that will drain well, yet retain a ceratin amount of water for your overheated, thirsty plants. Mel crafts a recipe for a good container growing medium which SFG devotees refer to as "Mel's mix."

Of course, like any recipe, there are variations, and you have to make do with what you've got. But my version is pretty close to his recommended one: 1 part each of peat moss, vermiculite, and compost, and then some soil additives thrown in: fertilizer, lime, charcoal. The peat moss and compost are pretty standard gardening media. Vermiculite is a mineral which, when heated to a certain temperature, expands like a kernel of popcorn. It's incredibly lightweight, yet it retains moisture, air, and plant food very well, releasing them slowly as plants demand them. Having a lot of vermiculite is crucial to having a friable soil that drains easily. The lime is for pH balance, the fertilizer is to give an extra boost to the young seeds, the charcoal aids in air circulation, raises the pH, and also retains water and nutrients like the vermiculite.

After many, many trips up and down the ladder, I began to mix my soil up on the roof, taking breaks when the wind got too strong. I started by "fluffing" up the peat moss (which comes compressed into a giant bale), then mixing the three main ingredients (peat, vermiculite, compost) in a trashcan. I'd basically throw in a 5-gallon bucket of each, which cumulatively would fill the can about half full. Then snap on the lid, roll the can around a bunch, dump the mixture into the corn planter, rake the soil around to mix it more.... and repeat.

At day's end, the container was about half full (4 half garbage cans' worth of additions) and I was exhausted.

Peat after fluffing.

Mixing the soil in the planter.

The site at end-of-day. I covered the planter to ensure the soil didn't get blown out overnight. 

Thursday, May 2, 2013

Safety First

Today I'd hoped to get a lot more done, but real life got in my way.

Nonetheless, I hauled a ton of compost, peat moss, and vermiculite up to the roof, along with some gardening tools, agriculture-grade charcoal, and a huge food-safe vinegar barrel (BPA-free!), which I'll be using to create a gravity fed drip-irrigation sytem. The fact is, these plants will all die if they're dependent on me going up to the roof every day of the summer. So I'm trying to create an irrigation solution (or "MacGyver" one, as J would say) that I can check once or twice a week.

I also wrapped some aircraft cable around a couple of chimneys and threaded it through screw eyes on the ends of the planters to serve as a safety line. I don't expect any winds to blow these things off the roof—particularly when they have soil weighing them down—but I'm not taking any chances.

Aircraft cable safety line. 
I stapled some .2ml plastic to the bottom of the corn planter to keep moisture from soaking the plywood and help delay the rotting process. 

The "rain barrel" is temporarily lashed to a chimney.

Wednesday, May 1, 2013

Beginnings....

A lot of posts on this blog are just going to be pictures of what I'm up to. Here's the corn planter being built out of plywood and 1x 12s.


The plywood is outdoor-rated (meaning the glue can stand some abuse), but it's not pressure-treated: I didn't want the harsh chemicals around food I was going to eat. 

I also didn't treat the wood with any kind of sealer, as a partial experiment: Since it's hard to find an eco-friendly sealer, I want to see how quickly this wood rots away. I'm confident it will last a season, but maybe not much longer than that. This thing will be too big to store over winter. If we are successful, I don't want to have to make a new planter every summer. There are tomato planters I built that do have a light sealer on them, so at the end of the summer, I'll compare them to the corn planter. 

There is a slight lip at the edge of the bottom which will be a base for attaching some supports later. 


Roughly 4' x 5'

My neighbor has an entire farm planted on her roof!